Vol. 1 / Issue 1
Print Tips: The Basics For The Best Results
 Talk to your printer early in the process of constructing your print document. A customer service or prepress person at the printing company will tell you about their production requirements for their particular presses. Ideally you (or your designer) will be using the Adobe Creative Cloud or Adobe Creative Suite programs to setup your file(s). While it is possible to create your files using other programs, using Adobe’s programs will give you the best results. Plus they come with all sorts of handy tools and features to assist you throughout the design process. Please be aware that we do not support Publisher files. If you have created your file in Publisher you will have to output it as a flattened, print ready pdf before we can print it. The use of Publisher also complicates matters if you wish us to make edits to your file.The bottom line is don’t use Publisher, hire a designer or get Adobe’s programs. They are the print industry standard programs so the native file types these programs produce will be compatible with whom ever you decide to contract printing services with.
(http://www.adobe.com/creativecloud.html) Click here to get Adobe Creative Cloud.
Adobe Programs: InDesign vs. Illustrator vs. Photoshop
When you go to print you’ll get the best results if you use the correct program for the correct project. Clients often ask,
I already have Photoshop, can’t I just layout my brochure, business card, logo, flyer, etc in that?
Well you can, but you definitely should not. Why? Photoshop’s primary function is raster graphic creation and editing. For type to print at its clearest, it needs to be vector based. Also the size of the resulting file will be huge, unlike the one you create in InDesign. This is because InDesign links to graphic files, resulting in a smaller file size whereas Photoshop saves them as part of the file. Each Adobe program was designed for a specific use in mind. They offer an ever increasing number of programs it seems, but the three will be focusing on today are InDesign, Illustrator and Photoshop. These three programs share very similar tool pallets, however you shouldn't use them all for the same tasks, and here’s a brief explanation of why.
InDesign is a print design program and is best used for type heavy documents (meaning the document is primarily text with a few images) with many pages, such as books, calendars, newsletters, brochures, business cards, etc. It has lots of handy tools, such as page number automation, master pages (which is great for making multiples of the same page layout), and it also will package all of your files together to easily send them to the printer.
Illustrator is for creating vector art and type elements for single page documents such as t-shirt designs, artwork for promotional items, cd covers, logos, etc.
Photoshop is an image-editing program with type tools that you can apply graphic elements to for web banners, photo restoration and editing. While you can output .eps files with Photoshop, the results are not always fantastic because this program is intended for raster graphics. If you need vector art then you are much better off using Illustrator or InDesign.
Some General Guide lines
When using images in your documents use the File > Place function to insert graphics or pictures into your document, don’t just copy and paste them. Make sure that all images are either grayscale or CMYK images and are at least 300 DPI. We can output RGB, however when the RIP coverts it to CMYK, unexpected color shifts may occur. Ensure that black type is really black and not made up of RGB or CMYK. If you are using Pantone colors you will need to add them to the swatch library. To do this in InDesign click on Window > Color > Swatches > New Color Swatch > PantoneSolid Coated (or whichever Pantone Library you are using). In Illustrator click on Window > Swatch Libraries > Color Books > Pantone Library of your choice. It's also a good idea to delete any unused color swatches from your pallet when you have finished laying out your file. If the document bleeds (either full or partial), make sure there are bleeds setup in the file and be sure to include crop marks. If you are designing multiple page files for print, such as a book; please paginate (layout the sequence of pages in the correct order). It's a good idea to number your pages in case there is an error in the page layout so that the printer can correct it for you. Make sure your document is designed at full size.
Here are some standard sizes:
- Business Card — 3.5" x 2"
- Postcard — 4" x 6"
- Single page flyer — 8.5" x 11"
- Single fold Brochure — 11" x 17" (8.5" x11" when folded)
- Trifold Brochure — 8.5" x 11"
When the designing is all done and you are ready to print, package your files, including all individual images & fonts (both printer and screen versions). Make sure you send each individual image file, don’t put them all in a word document.
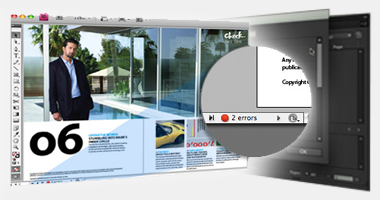
(http://helpx.adobe.com/indesign/using/preflighting-files-handoff.html)
Click here for a tutorial on preflighting & packaging in InDesign.
When saving files in TIFF format, use Adobe Photoshop whenever possible, and do not use LZW compression. For PDFs please flatten layers and outline all your fonts. Output the PDF as a high-resolution and high quality file (print ready). In the event you are told by your printer they need a .pdf with layers (this is usually because they need to color match something) then you will need to make sure that ‘Create Acrobat Layers’ is selected when you go to export the PDF file. To select this option, you must use ‘Acrobat 6 (PDF 1.5) or later compatibility’.
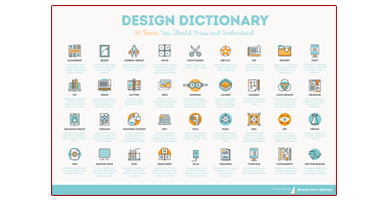
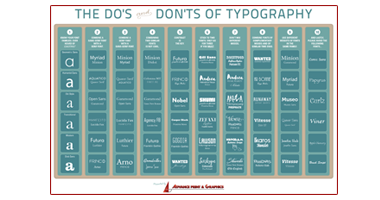
Design Infographics
Checkout our helpful infographics for some pro-design tips!
Frequently Asked Questions about File Setup
“Why should I outline the fonts?”
By outlining the fonts they become shapes, therefore eliminating all possible font issues when we open your file(s). Then it is not necessary to send the fonts along with your file. However it is important to note that once you outline the fonts you can no longer make edits to them, so double check your spelling and grammar!
“What are bleeds and when do I need to include them in my file(s)?”
A bleed is an extra 1/8 (.125") of an inch around the edge of the finished size of your file. Bleeds are necessary anytime you wish your elements (images, lines, words, etc.) to be printed to the edge of the page or to “bleed off” the edge of the page. If your document has bleeds be sure to include crop marks.
“What about margins?”
We recommend that you set your margins to .25 of an inch to ensure nothing gets trimmed off when your job is cut to its finished size. If your document has folds don't forget to include a gutter of at least .25 of an inch on each side of the fold line.
“Are there any special considerations for folding?”
If your document has folds (such as a brochure), pay close attention to your panel sizes. Generally, the width of a panel that folds into another panel should be reduced by 1/16in. For thicker paper stocks, you will need to reduce your panel a bit more. Feel free to contact us with any questions about this.
“What is your preferred file type?”
A flattened high-resolution (or print ready) .pdf is our preferred file type, but we can work with any of the following file types: .indd, .ai, .psd, .pdf, .jpg, .jpeg,.tiff, .eps, .gif, .png, .bmp, word docs, and excel files. If you wish us to make edits to your file(s) please be sure to include all fonts (both printer and screen versions), all individual image files and the native (original) file(s) instead of pdfs. We can (in most cases) make edits to pdfs (depending), but it makes the process much easier to have the native file format(s).
“How do I zip my files?”
—Mac users can zip files by highlighting the folder containing all of the files, right clicking and selecting Compress “Folder Name”. This will create a .zip file containing all the files within the original folder.
—Windows 7 users can Right-click the file or folder, point to Send To, and then click Compressed (zipped) Folder. This will create a .zip file containing all the files within the original folder.
—Windows 8 & 10 users can select the file or folder, tap or click Share, and then tap or click Zip. A new compressed folder is created in the same location with the same name as the file. You can rename the compressed folder like you can any other folder. Just select the folder, tap or click Home, and then tap or click Rename. To add new files or folders to your compressed folder, you can drag them to it.
Phone: 734-663-6816 • Toll-free: 800-696-9627 • Email: Info@advprint.com


